目录
spring核心
spring 框架提供了20多个模块,spring的架构图如下: 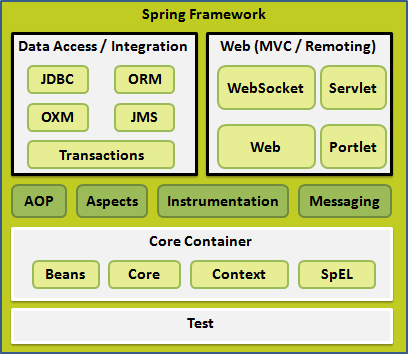
- 核心容器 核心容器由核心(core),Bean,上下文和表达式语言模块组成。
核心模块提供了框架的基本组成部分,包括依赖注入。Bean模块提供BeanFactory,他是一个功能的复杂实现。上下文模块在由核心和Bean的基础上,访问定义和配置的任何对象的媒介,其中ApplicationContext是重点。表达式语言提供了查询和操作一个对象的强大的表达式语言。 - 数据访问/集成 数据访问/集成层包括 JDBC,ORM,OXM,JMS 和事务处理模块,它们的细节如下: JDBC 模块提供了删除冗余的 JDBC 相关编码的 JDBC 抽象层。 ORM 模块为流行的对象关系映射 API,包括 JPA,JDO,Hibernate 和 iBatis,提供了集成层。 OXM 模块提供了抽象层,它支持对 JAXB,Castor,XMLBeans,JiBX 和 XStream 的对象/XML 映射实现。 Java 消息服务 JMS 模块包含生产和消费的信息的功能。 事务模块为实现特殊接口的类及所有的 POJO 支持编程式和声明式事务管理。
- Web Web 层由 Web,Web-MVC,Web-Socket 和 Web-Portlet 组成,它们的细节如下: Web 模块提供了基本的面向 web 的集成功能,例如多个文件上传的功能和使用 servlet 监听器和面向 web 应用程序的上下文来初始化 IoC 容器。 Web-MVC 模块包含 Spring 的模型-视图-控制器(MVC),实现了 web 应用程序。 Web-Socket 模块为 WebSocket-based 提供了支持,而且在 web 应用程序中提供了客户端和服务器端之间通信的两种方式。 Web-Portlet 模块提供了在 portlet 环境中实现 MVC,并且反映了 Web-Servlet 模块的功能。
- 其他还有其他一些重要的模块,像 AOP,Aspects,Instrumentation,Web 和测试模块,它们的细节如下: AOP 模块提供了面向方面的编程实现,允许你定义方法拦截器和切入点对代码进行干净地解耦,它实现了应该分离的功能。 Aspects 模块提供了与 AspectJ 的集成,这是一个功能强大且成熟的面向切面编程(AOP)框架。 Instrumentation 模块在一定的应用服务器中提供了类 instrumentation 的支持和类加载器的实现。 Messaging 模块为 STOMP 提供了支持作为在应用程序中 WebSocket 子协议的使用。它也支持一个注解编程模型,它是为了选路和处理来自 WebSocket 客户端的 STOMP 信息。 测试模块支持对具有 JUnit 或 TestNG 框架的 Spring 组件的测试。
入门实例
需要的核心jar包为:
commons-logging-1.1.1
spring-aop-4.1.6.RELEASE
spring-aspects-4.1.6.RELEASE
spring-beans-4.1.6.RELEASE
spring-context-4.1.6.RELEASE
spring-context-support-4.1.6.RELEASE
spring-core-4.1.6.RELEASE
spring-expression-4.1.6.RELEASE
spring-instrument-4.1.6.RELEASE
spring-instrument-tomcat-4.1.6.RELEASE
spring-jdbc-4.1.6.RELEASE
spring-jms-4.1.6.RELEASE
spring-messaging-4.1.6.RELEASE
spring-orm-4.1.6.RELEASE
spring-oxm-4.1.6.RELEASE
spring-test-4.1.6.RELEASE
spring-tx-4.1.6.RELEASE
spring-web-4.1.6.RELEASE
spring-webmvc-4.1.6.RELEASE
spring-webmvc-portlet-4.1.6.RELEASE
spring-websocket-4.1.6.RELEASE
创建实例bean
public class HelloWorld {
   private String message;
   public void setMessage(String message){
      this.message  = message;
   }
   public void getMessage(){
      System.out.println("Your Message : " + message);
   }
}
配置bean的xml文件
<?xml version="1.0" encoding="UTF-8"?>

<beans xmlns="http://www.springframework.org/schema/beans"
    xmlns:xsi="http://www.w3.org/2001/XMLSchema-instance"
    xsi:schemaLocation="http://www.springframework.org/schema/beans
    http://www.springframework.org/schema/beans/spring-beans-3.0.xsd">

   <bean id="helloWorld" class="com.tutorialspoint.HelloWorld">
       <property name="message" value="Hello World!"/>
   </bean>

</beans>
然后在Main函数中得到bean
import org.springframework.context.ApplicationContext;
import org.springframework.context.support.ClassPathXmlApplicationContext;
public class MainApp {
   public static void main(String[] args) {
      ApplicationContext context =
             new ClassPathXmlApplicationContext("Beans.xml");
      HelloWorld obj = (HelloWorld) context.getBean("helloWorld");
      obj.getMessage();
   }
}
Bean
- bean的定义称为
配置元数据
| 属性 | 描述 |
|---|---|
| class | 这个属性是强制性的,并且指定用来创建 bean 的 bean 类。 |
| name | 这个属性指定唯一的 bean 标识符。在基于 XML 的配置元数据中,你可以使用 ID 和/或 name 属性来指定 bean 标识符。 |
| scope | 这个属性指定由特定的 bean 定义创建的对象的作用域,它将会在 bean 作用域的章节中进行讨论。 |
| constructor-arg | 它是用来注入依赖关系的,并会在接下来的章节中进行讨论。 |
| properties | 它是用来注入依赖关系的,并会在接下来的章节中进行讨论。 |
| autowire | 它是用来注入依赖关系的,并会在接下来的章节中进行讨论。 |
| lazy-init | 延迟初始化的 bean 告诉 IoC 容器在它第一次被请求时,而不是在启动时去创建一个 bean 实例。 |
| init-method | 在 bean 的所有必需的属性被容器设置之后,调用回调方法。它将会在 bean 的生命周期章节中进行讨论。 |
| destroy-method | 当包含该 bean 的容器被销毁时,使用回调方法。它将会在 bean 的生命周期章节中进行讨论。 |
配置元数据可以由xml文件定义,可以用注解进行定义同时还可以用java配置。
- Bean scope 如果想是单例的话就用singleton,多例用prototype。
| 作用域 | 描述 |
|---|---|
| singleton | 该作用域将 bean 的定义的限制在每一个 Spring IoC 容器中的一个单一实例(默认)。 |
| prototype | 该作用域将单一 bean 的定义限制在任意数量的对象实例。 |
| request | 该作用域将 bean 的定义限制为 HTTP 请求。只在 web-aware Spring ApplicationContext 的上下文中有效。 |
| session | 该作用域将 bean 的定义限制为 HTTP 会话。 只在web-aware Spring ApplicationContext的上下文中有效。 |
| global-session | 该作用域将 bean 的定义限制为全局 HTTP 会话。只在 web-aware Spring ApplicationContext 的上下文中有效。 |
- Bean 生命周期 主要是init-method 和 destory-method
使用init-method的方法
<bean id="exampleBean"  class="examples.ExampleBean" init-method="init"/>
<!-- init方法在ExampleBean中定义 -->public class ExampleBean {
public void init() {
// do some initialization work
}
}同样的道理,如果要用destory-method,那么:
<bean id="exampleBean"  class="examples.ExampleBean" destory-method="destory"/>
<!-- init方法在ExampleBean中定义 -->public class ExampleBean {
#### public void destory() {
// do some initialization work
}
}- Bean的后置处理
BeanPostProcessor接口作用是:如果我们需要在Spring容器完成Bean的实例化、配置和其他的初始化前后添加一些自己的逻辑处理,我们就可以定义一个或者多个BeanPostProcessor接口的实现,然后注册到容器中。 spring中bean的实例化过程如图: 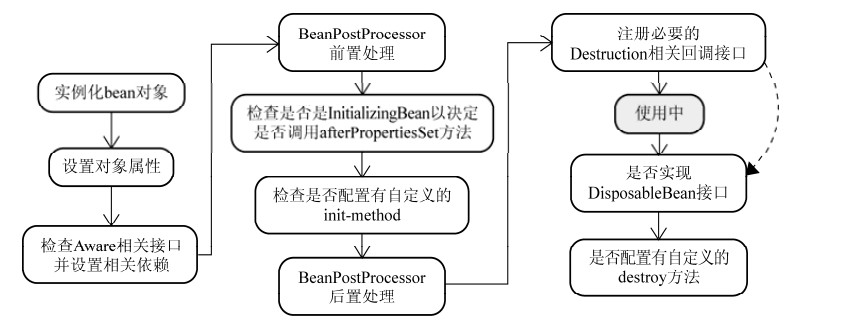
这个接口有两个需要实现的方法。postProcessBeforeInitialization和postProcessAfterInitialization
- Bean定义继承
在xml中,使用parent属性,例如
   <bean id="helloIndia" class="com.tutorialspoint.HelloIndia" parent="helloWorld">
      <property name="message1" value="Hello India!"/>
      <property name="message3" value="Namaste India!"/>
   </bean>
还可以在xml中定义模板
   <bean id="templateBean" abstract="true" >
   	<property name="name" value="zhongguo"></property>
   </bean>
   <bean id="helloJS" class="com.xixi.bean.HelloJS" parent="templateBean"/>
但是模板bean中的所有属性,继承的bean必须全部要有,否则报错。
依赖注入
依赖注入有两种方式,构造函数注入和set方法注入
- 构造函数注入
可以使用如下三种方式:
 <!-- 构造函数注入 -->
  <bean id="car" class="com.xixi.bean.Car">
   		<constructor-arg ref="door"/>
   		<constructor-arg ref="wheel"/>
   </bean>
   <bean id="car" class="com.xixi.bean.Car">
   		<constructor-arg type="java.lang.String" value="bmw"/>
   		<constructor-arg type="java.lang.String" value="007"></constructor-arg>
   </bean>
   <bean id="car" class="com.xixi.bean.Car">
   		<constructor-arg index="0" value="bmw"/>
   		<constructor-arg index="1" value="007"/>
   </bean>
   <bean id="door" class="com.xixi.bean.Door"/>
<bean id="wheel" class="com.xixi.bean.Wheel"/>- set方法注入 在xml中使用的是property元素或者使用p-namespace
    <!-- set方法注入 -->
    <bean id="car" class="com.xixi.bean.Car">
    	<property name="carName" value="bmw"></property>
    </bean>
    <bean id="car" class="com.xixi.bean.Car" p:carName="bmw"/>
    <!-- 使用p的时候要在开头加上校验
      xmlns:p="http://www.springframework.org/schema/p"
-->- 在bean中注入集合
   <bean id="collectionMapBean" class="com.xixi.bean.CollectionMapBean">
		<property name="addressList">
			<list>
				<value>china</value>
				<value>uk</value>
			</list>
		</property>
		<property name="addressSet">
			<set>
				<value>india</value>
				<value>budan</value>
			</set>
		</property>
		<property name="addressMap">
			<map>
				<entry key="1" value="INDIA" />
				<entry key="2" value="Pakistan" />
				<entry key="3" value="USA" />
				<entry key="4" value="USA" />
			</map>
		</property>
		<property name="addressProperties">
			<props>
				<prop key="one">INDIA</prop>
				<prop key="two">Pakistan</prop>
				<prop key="three">USA</prop>
				<prop key="four">USA</prop>
			</props>
		</property>
</bean>- 自动注入Bean
前面讲的都是手动注入Bean,Spring还可以通过以下几种方式自动注入Bean。第一种方式是byName,第二种byType,第三种constructor,第四种autodetect(先尝试constructor,再用byType)
- byName
<!-- 自动注入door和wheel -->
	<bean id="car" class="com.xixi.bean.Car" autowire="byName"/>
	<bean id="door" class="com.xixi.bean.Door" />
<bean id="wheel" class="com.xixi.bean.Wheel"/>- byType 同理是一样的,只不过是找相同的类去注入。
- byConstructor 同理按照构造器自动注入。
   <bean id="textEditor" class="com.tutorialspoint.TextEditor"
      autowire="constructor">
      <constructor-arg value="Generic Text Editor"/>
   </bean>
####注解配置 启用注解配置的话需要在xml中添加
 <context:annotation-config/>
 <!--
    需要增加校验
	http://www.springframework.org/schema/context
    http://www.springframework.org/schema/context/spring-context-4.3.xsd
    -->
注意:使用注解的方式并不能完全脱离xml文件。只能减少xml的配置项。 声明Bean的注解有@Component,@Service,@Repository,@Controller。 注入Bean的注解有@AuAutowired,@Inject,@Resource。
声明Bean的组件必须在xml文件中加入下面这句话让spring自动寻找这些bean:
<context:component-scan base-package="com.xixi.bean"/>声明Bean的注解后面可以加上scope
@Component
@Scope("singleton")
public class Car {
}
Autowired注入bean可以写在类成员,构造函数,set方法上
####java配置
和xml配置bean功能相同,表现形式不同而已。用java配置的bean的方法如下:
@Configuration //声明是个java配置bean 也可以引入另一个Config ,@Import(Config2.class)
public class MyConfig{
	@Bean //声明一个bean  @Bean(initMethod="方法名",destoryMethod="") @Scope("");
    public Car  car(){
    	return new Car();
    }
}
然后可以利用AnnotationConfigApplicationContext得到Bean
public static void main(String[] args) {
   ApplicationContext ctx =
   new AnnotationConfigApplicationContext(MyConfig.class);
   Car car=ctx.getBean(Car.class);
}
####Spring事件 spring中有四种事件,分别是ContextRefreshedEvent,ContextStartedEvent,ContextStoppedEvent,RequestHandledEvent 如何监听这些事件?实现ApplicationListener<ContextStartedEvent>接口
import org.springframework.context.ApplicationListener;
import org.springframework.context.event.ContextStartedEvent;
import org.springframework.stereotype.Component;

@Component
public class MyStartEventListener implements ApplicationListener<ContextStartedEvent> {

	public void onApplicationEvent(ContextStartedEvent arg0) {
		System.out.println("start context!!"+arg0.getTimestamp());
	}

}
####SpringAOP
第一种方式,纯xml配置。 首先在xml文件中加入aop的校验
<?xml version="1.0" encoding="UTF-8"?>
<beans xmlns="http://www.springframework.org/schema/beans"
    xmlns:xsi="http://www.w3.org/2001/XMLSchema-instance"
    xmlns:aop="http://www.springframework.org/schema/aop"
    xsi:schemaLocation="http://www.springframework.org/schema/beans
    http://www.springframework.org/schema/beans/spring-beans-3.0.xsd
    http://www.springframework.org/schema/aop
    http://www.springframework.org/schema/aop/spring-aop-3.0.xsd ">

   <!-- bean definition & AOP specific configuration -->

</beans>
其次需要加载aspect的jar包
<!-- aop支持 -->
		<dependency>
			<groupId>org.springframework</groupId>
			<artifactId>spring-aop</artifactId>
			<version>${org.springframework-version}</version>
		</dependency>
		<!-- aspectj支持 -->
		<dependency>
			<groupId>org.aspectj</groupId>
			<artifactId>aspectjrt</artifactId>
			<version>${org.aspectj-version}</version>
		</dependency>
		<dependency>
			<groupId>org.aspectj</groupId>
			<artifactId>aspectjweaver</artifactId>
			<version>${org.aspectj-version}</version>
		</dependency>

		<!-- https://mvnrepository.com/artifact/aopalliance/aopalliance -->
		<dependency>
			<groupId>aopalliance</groupId>
			<artifactId>aopalliance</artifactId>
			<version>1.0</version>
		</dependency>
最后是声明一个aspect。在xml中的配置如下
<aop:config>
   <aop:aspect id="myAspect" ref="aBean">
   <aop:pointcut id="businessService"
      expression="execution(* com.xyz.myapp.service.*.*(..))"/>
       <aop:before pointcut-ref="businessService"
         method="doRequiredTask"/>
      <!-- an after advice definition -->
      <aop:after pointcut-ref="businessService"
         method="doRequiredTask"/>
      <!-- an after-returning advice definition -->
      <!--The doRequiredTask method must have parameter named retVal -->
      <aop:after-returning pointcut-ref="businessService"
         returning="retVal"
         method="doRequiredTask"/>
      <!-- an after-throwing advice definition -->
      <!--The doRequiredTask method must have parameter named ex -->
      <aop:after-throwing pointcut-ref="businessService"
         throwing="ex"
         method="doRequiredTask"/>
      <!-- an around advice definition -->
      <aop:around pointcut-ref="businessService"
         method="doRequiredTask"/>
   </aop:aspect>
</aop:config>
<bean id="aBean" class="...">
...
</bean>
第二种方式,xml+aspect注解 首先通过Aspect声明他是一个切面
@Aspect
public class Logging {
   /** Following is the definition for a pointcut to select
    *  all the methods available. So advice will be called
    *  for all the methods.
    */
   @Pointcut("execution(* com.tutorialspoint.*.*(..))")
   private void selectAll(){}
   /**
    * This is the method which I would like to execute
    * before a selected method execution.
    */
   @Before("selectAll()")
   public void beforeAdvice(){
      System.out.println("Going to setup student profile.");
   }
   /**
    * This is the method which I would like to execute
    * after a selected method execution.
    */
   @After("selectAll()")
   public void afterAdvice(){
      System.out.println("Student profile has been setup.");
   }
   /**
    * This is the method which I would like to execute
    * when any method returns.
    */
   @AfterReturning(pointcut = "selectAll()", returning="retVal")
   public void afterReturningAdvice(Object retVal){
      System.out.println("Returning:" + retVal.toString() );
   }
   /**
    * This is the method which I would like to execute
    * if there is an exception raised by any method.
    */
   @AfterThrowing(pointcut = "selectAll()", throwing = "ex")
   public void AfterThrowingAdvice(IllegalArgumentException ex){
      System.out.println("There has been an exception: " + ex.toString());
   }
}
其次,配置xml文件
<aop:aspectj-autoproxy/>  <!-- 开始spring对aspect的支持  -->
<bean id="logging" class="com.tutorialspoint.Logging"/> <!-- 定义aspectj 的Bean  -->
第三种方式。纯代码配置(其实和上面一样,只不过多了基于java的配置而已) 首先声明aspect,并且注册为bean
@Aspect
@Component
public class AnnotationLogAspect {
	@Pointcut("@annotation(com.xixi.bean.Student)")
	public void annotationPointCut(){}

	@Before("execution(* com.xixi.bean.*.*(..))")
	public void before(JoinPoint joinpoint){
		System.out.println("注解式aop"+joinpoint.getKind());
	}
	//pointcut-ref="selectAll" returning="retVal" method="afterReturningAdvice"
	@AfterReturning(pointcut="annotationPointCut",returning="retVal")
	public void afterreturn(){

	}
}
其次定义java配置
@Configuration
@ComponentScan("com.xixi.bean,com.xixi.aspect")
@EnableAspectJAutoProxy // 对AspectJ支持//如果是在xml中,则xml配置为 <aop:aspectj-autoproxy/>
public class MyConfig {

}